Termux API深度学习与Termux USB问题解决

需要先理解的一些上下文

termux 为了能在命令行中使用 am 命令,https://github.com/termux/termuxAm

因为 Android 上的 am 会限制只能在 shell 中使用,termux-am 就是一个通用版本

背景

termux 为了能让用户能在 terminal 中调用 Android API,开发了 termux-api

可以看下 termux-api-package 编译会生成的脚本

1
2
3
4
5
6
7
8
9
10
11
12
13
14
15
16
17
18
19
termux-api-start.in            termux-media-player.in         termux-sms-inbox.in
termux-api-stop.in termux-media-scan.in termux-sms-list.in
termux-audio-info.in termux-microphone-record.in termux-sms-send.in
termux-battery-status.in termux-nfc.in termux-speech-to-text.in
termux-brightness.in termux-notification-channel.in termux-storage-get.in
termux-call-log.in termux-notification-list.in termux-telephony-call.in
termux-camera-info.in termux-notification-remove.in termux-telephony-cellinfo.in
termux-camera-photo.in termux-notification.in termux-telephony-deviceinfo.in
termux-clipboard-get.in termux-saf-create.in termux-toast.in
termux-clipboard-set.in termux-saf-dirs.in termux-torch.in
termux-contact-list.in termux-saf-ls.in termux-tts-engines.in
termux-dialog.in termux-saf-managedir.in termux-tts-speak.in
termux-download.in termux-saf-mkdir.in termux-usb.in
termux-fingerprint.in termux-saf-read.in termux-vibrate.in
termux-infrared-frequencies.in termux-saf-rm.in termux-volume.in
termux-infrared-transmit.in termux-saf-stat.in termux-wallpaper.in
termux-job-scheduler.in termux-saf-write.in termux-wifi-connectioninfo.in
termux-keystore.in termux-sensor.in termux-wifi-enable.in
termux-location.in termux-share.in termux-wifi-scaninfo.in

以 termux-toast 为例

1
2
3
4
5
6
7
8
9
10
11
12
13
14
15
16
17
18
19
20
21
22
23
24
25
26
27
28
29
30
31
32
33
34
35
36
37
38
39
40
41
42
43
44
45
46
47
48
49
#!@TERMUX_PREFIX@/bin/bash
set -e -u

SCRIPTNAME=termux-toast
show_usage () {
echo "Usage: termux-toast [-b bgcolor] [-c color] [-g gravity] [-s] [text]"
echo "Show text in a Toast (a transient popup)."
echo "The toast text is either supplied as arguments or read from stdin"
echo "if no arguments are given. Arguments will take precedence over stdin."
echo "If toast text is not passed as arguments or with stdin, then there will"
echo "be a 3s delay."
echo " -h show this help"
echo " -b set background color (default: gray)"
echo " -c set text color (default: white)"
echo " -g set position of toast: [top, middle, or bottom] (default: middle)"
echo " -s only show the toast for a short while"
echo "NOTE: color can be a standard name (i.e. red) or 6 / 8 digit hex value (i.e. \"#FF0000\" or \"#FFFF0000\") where order is (AA)RRGGBB. Invalid color will revert to default value"
exit 0
}

PARAMS=""
while getopts :hsc:b:g: option
do
case "$option" in
h) show_usage;;
s) PARAMS+=" --ez short true";;
c) PARAMS+=" --es text_color $OPTARG";;
b) PARAMS+=" --es background $OPTARG";;
g) PARAMS+=" --es gravity $OPTARG";;
?) echo "$SCRIPTNAME: illegal option -$OPTARG"; exit 1;
esac
done
shift $((OPTIND-1))

CMD="@TERMUX_PREFIX@/libexec/termux-api Toast $PARAMS"

# If toast text was not passed as an argument, then attempt to read from STDIN with a 3s timeout
# Toast text arguments takes precedence over STDIN
if [ $# = 0 ]; then
set +e; IFS= read -t 3 -r -d '' TOAST_TEXT; set -e;
else
TOAST_TEXT="$*"
fi

# Trim trailing newlines
TOAST_TEXT="$(echo "$TOAST_TEXT")"

echo "$TOAST_TEXT" | $CMD

其中关键的调用是 CMD="@TERMUX_PREFIX@/libexec/termux-api Toast $PARAMS"

也就是所有的这一系列的脚本都会调用 termux-api 这个命令

一些命令

1
2
3
4
5
6
$ termux-usb -l
[
"/dev/bus/usb/001/002",
]
$ termux-usb -r /dev/bus/usb/001/002
Access granted.

一些更神奇的命令

1
2
$ termux-usb -e echo -r /dev/bus/usb/001/002
7

没错,这行命令运行后,会先弹出一个对话框,询问是否允许访问 USB 设备,用户按下是后,会在 terminal 中输出 7

这个7就是文件描述符,后续的任意进程拿到这个文件描述符,就能够读写了

对应的 java 代码

1
2
3
4
5
6
7
8
9
10
11
12
13
private static int open(final @NonNull UsbDevice device, final Context context) {
final UsbManager usbManager = (UsbManager) context.getSystemService(Context.USB_SERVICE);
UsbDeviceConnection connection = usbManager.openDevice(device);
if (connection == null)
return -2;
int fd = connection.getFileDescriptor();
if (fd == -1) {
connection.close();
return -1;
}
openDevices.put(fd, connection);
return fd;
}

adb 不能在 Android 本地运行并且能够访问 OTG 的本质原因是,对 Linux/macOS/Windows 的平台而言,普通应用也是可以读取 USB 串口设备的,但是安卓上访问需要权限

而有了这种方式,我如果把上述的代码换成

1
$ termux-usb -e custom_adb -r /dev/bus/usb/001/002

交给一个特殊的 adb 一个文件描述符,adb 在 Andoird 本机运行且可以访问 OTG 就不是问题了

Uncon、ADB KIT 也是这样做的

研究 termux-api

https://github.com/termux/termux-api-package

里面包含了上述的脚本,还有两个 C 代码

termux-api-broadcast.c 和 termux-api.c

实际在 termux 终端中执行的 termux-api 二进制是由 termux-api-broadcast.c 编译而来

termux-api 有两种模式,一种是通过 broadcast 方式,一种是通过 socket 方式

整体架构设计图

接下来我们分析这两种模式

Socket

socket 方式需要先启动

App 启动 -> SocketListener.createSocketListener -> Bind Address

随即会监听 com.termux.api://listen 这个 unix socket

执行 termux-api 这个命令的时候,会将参数都传递到 socket 中

然后由 SocketListener 来解析参数,再发送一个广播到 TermuxApiReceiver

TermuxApiReceiver 会解析第一个参数以匹配需要调用的 API 类型,例如 Toast、USB

部分代码如下:

1
2
3
4
5
6
7
8
9
10
11
12
13
14
15
16
17
18
19
20
21
22
23
24
25
26
27
switch (apiMethod) {
case "Clipboard":
ClipboardAPI.onReceive(this, context, intent);
break;
case "Dialog":
DialogAPI.onReceive(context, intent);
break;
case "Download":
DownloadAPI.onReceive(this, context, intent);
case "Notification":
NotificationAPI.onReceiveShowNotification(this, context, intent);
break;
case "SAF":
SAFAPI.onReceive(this, context, intent);
break;
case "Toast":
ToastAPI.onReceive(context, intent);
break;
case "Usb":
UsbAPI.onReceive(this, context, intent);
break;
case "Volume":
VolumeAPI.onReceive(this, context, intent);
break;
default:
Logger.logError(LOG_TAG, "Unrecognized 'api_method' extra: '" + apiMethod + "'");
}

此时数据也通过套接字回传到 termux-api

Broadcast

termux-api 直接调用 termux-am,然后直接发送广播到 TermuxApiReceiver,同时会告知 TermuxApiReceiver 往哪个 address 回传返回的数据,但是这个在 Android 14上失效了,不知道为啥
并且 termux-api 在代码中

1
2
3
if (android_get_device_api_level() < 34) {
listenfd = socket(AF_UNIX, SOCK_STREAM|SOCK_CLOEXEC, 0);
}

也就是只有当 Android 版本小于14的时候,才会使用 socket 方式

大于等于 14 的时候,就会使用 broadcast 方式

而 boardcast 在 Android 14上又是失效的,这就是个大坑

termux 之所以不会遇到这个问题,是因为另一个究极无敌破坏性的改动,导致他们的 targetSdk 一直是 28,升上28以后,termux 就不能用了,所以 Termux 的 targetSdk 一直是 28,并且不能再上架 Google Play

解决

直接把这段 if 代码注释掉就行了,不知为何会加这个限制

1
2
3
if (android_get_device_api_level() < 34) {
listenfd = socket(AF_UNIX, SOCK_STREAM|SOCK_CLOEXEC, 0);
}

源码的注释是

1
2
3
4
5
6
7
8
9
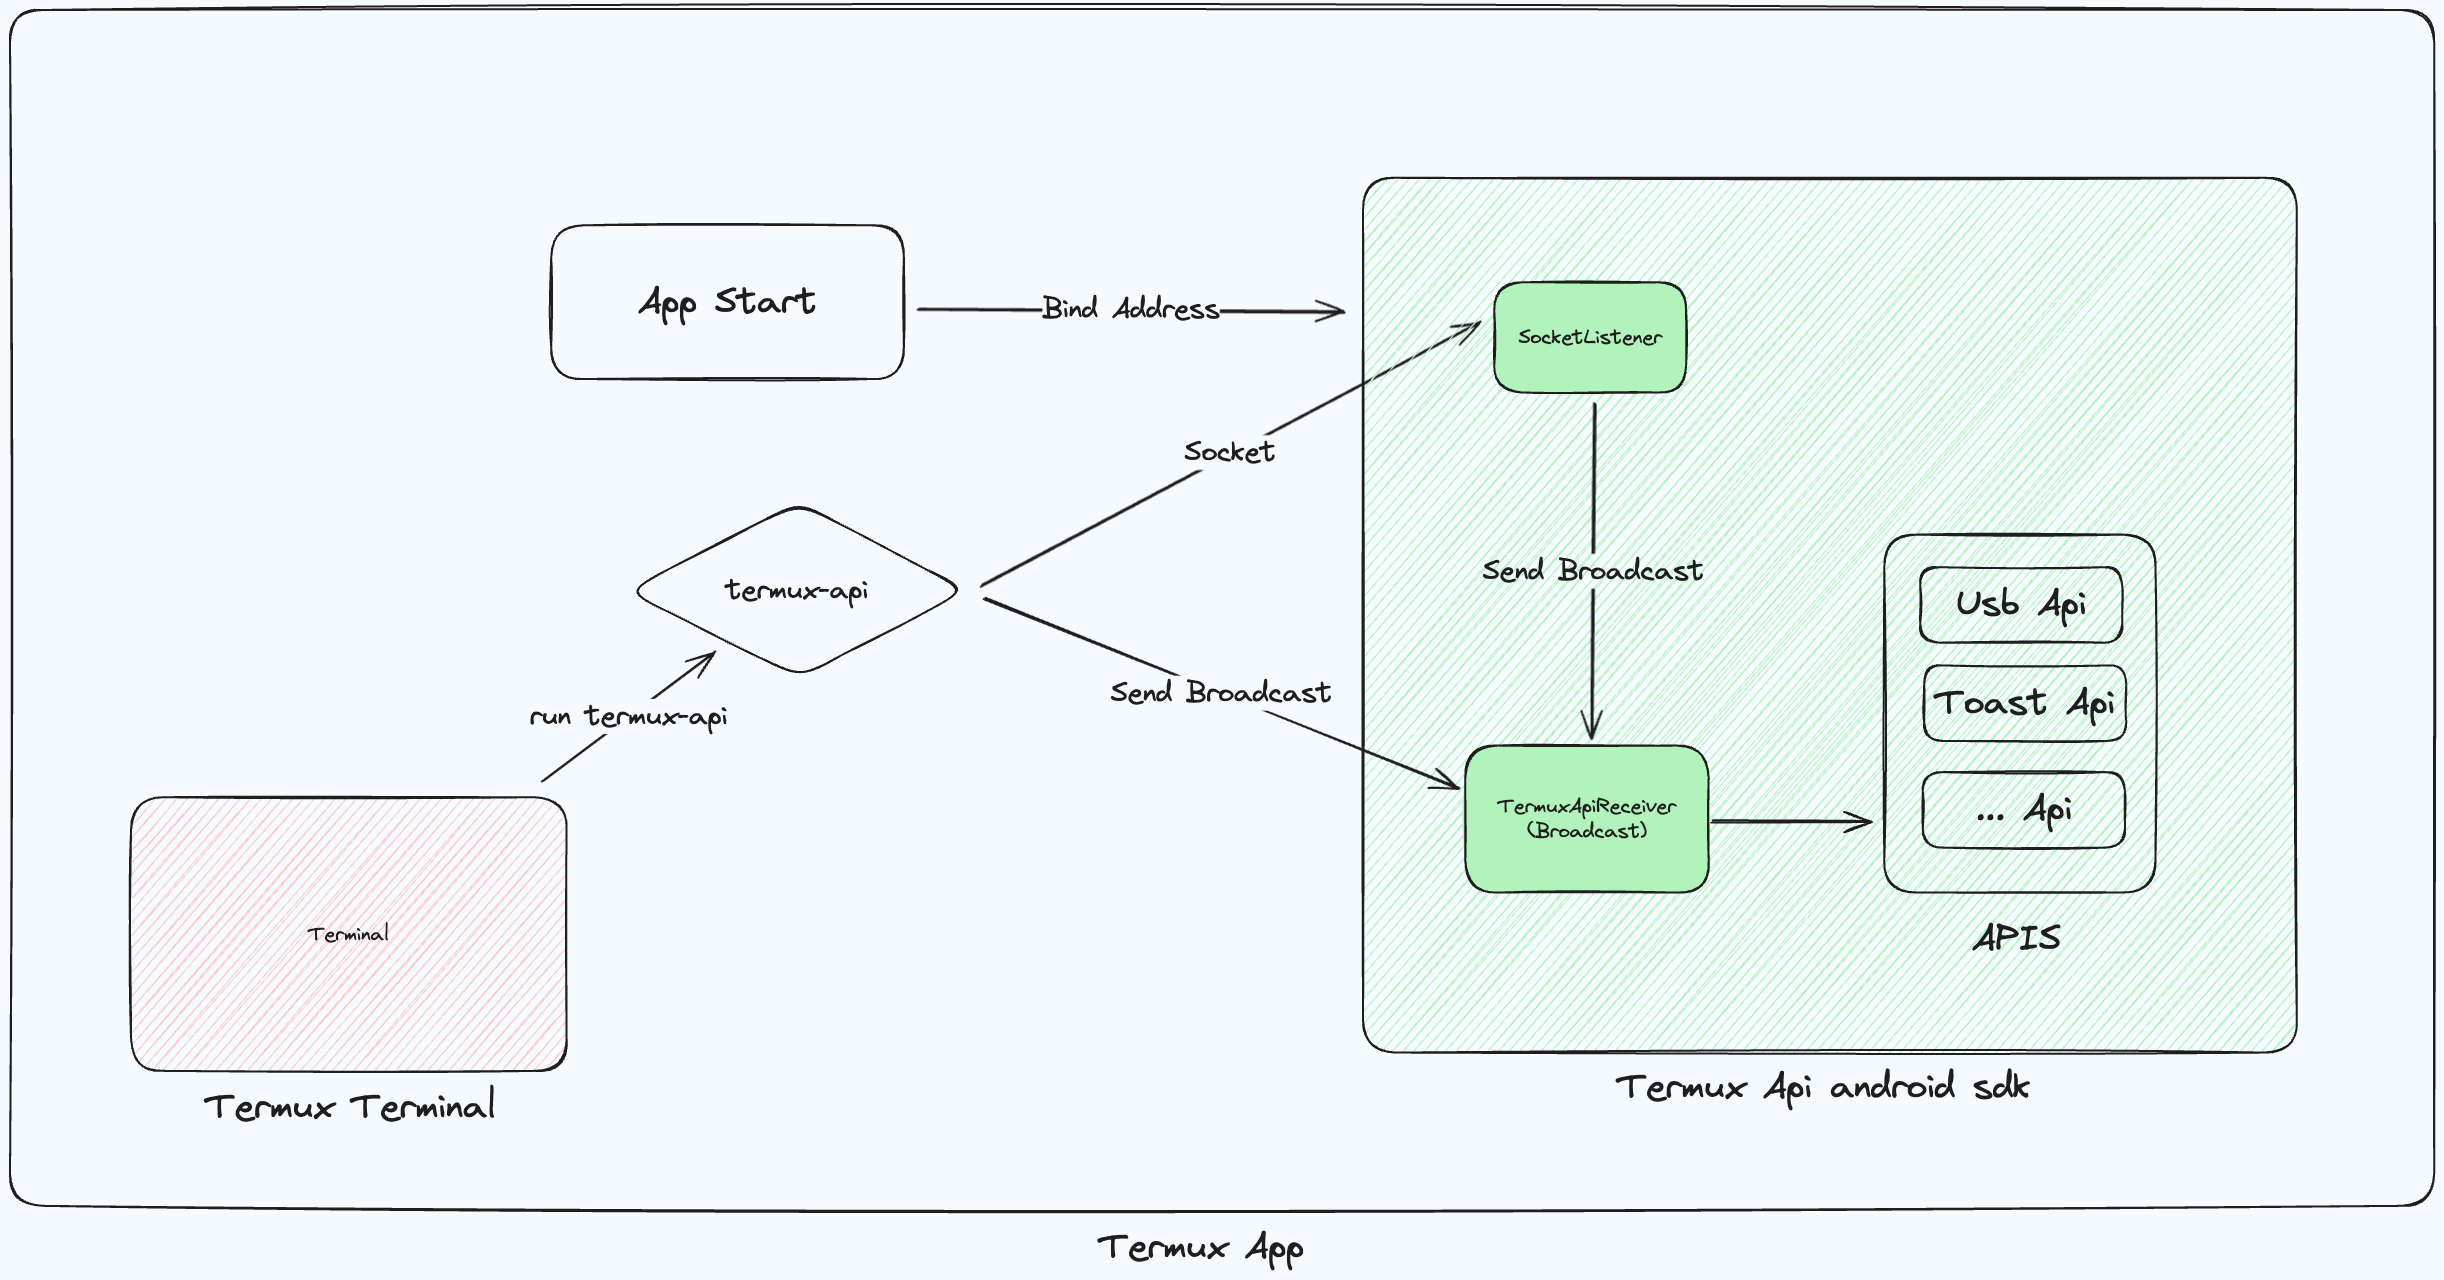
// Try to connect over the listen socket first if running on Android `< 14`.
// On Android `>= 14`, if termux-api app process was started previously
// and it started the socket server, but later Android froze the
// process, the socket will still be connectable, but no response
// will be received until the app process is unfrozen agin and
// `read()` call below will hang indefinitely until that happens,
// so use legacy `am broadcast` command, which will also unfreeze
// the app process to deliver the intent.
// - https://github.com/termux/termux-api/issues/638#issuecomment-1813233924

第二个Android14的问题

这是在研究 Android Local ADB 的时候,遇到的问题

解决了上面的问题后,还有一个新的问题

先看 termux-usb 源码

1
2
3
4
5
6
7
8
9
10
11
12
13
14
15
16
17
18
19
20
21
22
23
24
25
26
27
28
29
30
31
32
33
34
35
36
37
38
39
40
41
42
43
44
45
46
47
48
49
50
51
52
53
54
55
56
57
58
59
60
61
62
63
64
65
66
67
68
69
70
71
#!/system/bin/sh
# set -e -u

SCRIPTNAME=termux-usb
show_usage () {
echo "Usage: $SCRIPTNAME [-l | [-r] [-E] [-e command] [device | vendorId productId]]"
echo "List or access USB devices. Devices cannot be accessed directly,"
echo " only using $SCRIPTNAME."
echo " -l list available devices"
echo " -r show permission request dialog if necessary"
echo " -e command execute the specified command with a file descriptor"
echo " referring to the device as an argument (unless -E"
echo " argument is given)"
echo " -E transfer file descriptor as env var instead of as"
echo " command line argument"
exit 0
}

ACTION="permission"
PARAMS=""
while getopts :hlre:E option
do
case "$option" in
h) show_usage;;
l) ACTION="list";;
r) PARAMS="$PARAMS --ez request true";;
e) ACTION="open"; export TERMUX_CALLBACK="$OPTARG";;
E) export TERMUX_EXPORT_FD=true;;
?) echo "$SCRIPTNAME: illegal option -$OPTARG"; exit 1;
esac
done
shift $((OPTIND-1))

if [ "$ACTION" == "list" ]
then
if [ $# -gt 0 ]; then echo "$SCRIPTNAME: too many arguments"; exit 1; fi
else
if [ $# -lt 1 ]; then
echo "$SCRIPTNAME: missing -l or device path"
exit 1
elif [ $# -eq 1 ]; then
# The device's usbfs path has been provided
PARAMS="$PARAMS --es device $1"
elif [ $# -eq 2 ]; then
# A vendorId and ProductId of the device has been provided
PARAMS="$PARAMS --es vendorId $1"
PARAMS="$PARAMS --es productId $2"
else
echo "$SCRIPTNAME: too many arguments"
exit 1
fi
fi
echo "TERMUX_CALLBACK:$TERMUX_CALLBACK"
echo "TERMUX_EXPORT_FD:$TERMUX_EXPORT_FD"
CMD="termux-api Usb -a $ACTION $PARAMS"
termux-toast "CMD:$CMD"
echo "CMD:$CMD"

if [ "$ACTION" == "permission" ]
then
if [ "$($CMD)" == "yes" ]
then
echo "Access granted."
exit 0
else
echo "Access denied."
exit 1
fi
else
$CMD
fi

当我在 Android 14上运行 termux-usb -l 的时候,一切正常

但是把命令换成 termux-usb -r /dev/bus/usb/001/002 的时候,窗口能正常弹出,权限能正常授予,但是进程却没有返回结果

一直卡住,直到 Android 系统提示应用无响应,再等待一会,进程才返回

这就是第二个坑

还是 termux target sdk 是 28 的问题,他们不会遇到这个情况

关键问题代码

1
2
3
4
5
6
7
8
9
10
11
12
13
14
15
16
17
18
19
20
21
22
23
24
25
26
27
28
29
30
31
32
33
34
35
36
37
private static boolean requestPermission(final @NonNull UsbDevice device, final Context context) {
Looper.prepare();
Looper looper = Looper.myLooper();
final boolean[] result = new boolean[1];

final String ACTION_USB_PERMISSION = TermuxConstants.TERMUX_API_PACKAGE_NAME + ".USB_PERMISSION";
final BroadcastReceiver usbReceiver = new BroadcastReceiver() {
@Override
public void onReceive(final Context usbContext, final Intent usbIntent) {
String action = usbIntent.getAction();
if (ACTION_USB_PERMISSION.equals(action)) {
synchronized (this) {
UsbDevice device = usbIntent.getParcelableExtra(UsbManager.EXTRA_DEVICE);
if (usbIntent.getBooleanExtra(UsbManager.EXTRA_PERMISSION_GRANTED, false)) {
if (device != null) {
result[0] = true;
if (looper != null) looper.quit();
}
} else {
result[0] = false;
if (looper != null) looper.quit();
}
}

}
}
};

final UsbManager usbManager = (UsbManager) context.getSystemService(Context.USB_SERVICE);
PendingIntent permissionIntent = PendingIntent.getBroadcast(context, 0,
new Intent(ACTION_USB_PERMISSION), 0);
IntentFilter filter = new IntentFilter(ACTION_USB_PERMISSION);
context.getApplicationContext().registerReceiver(usbReceiver, filter);
usbManager.requestPermission(device, permissionIntent);
Looper.loop();
return result[0];
}

按理说,PendingIntent 请求的弹出,我点击确认后,就会发出一个广播,这个内部的 usbReceiver 就能立马接收到,然后返回结果

但并不会

后来我尝试将 PendingIntent 的构造换成 PendingIntent.getActivity,授予权限后,Activity 马上就被打开了,通过 UsbManager.EXTRA_PERMISSION_GRANTED 字段,也可以知道权限是否被授予

但是整个流程就会有新的 Activity 打开

于是我再将 PendingIntent 的构造换成 PendingIntent.getService,这也是最后的解决方法

关键的修改代码如下

1
2
3
4
5
6
7
8
9
10
11
12
13
14
15
16
17
18
19
20
21
22
23
24
25
26
27
28
29
30
31
32
33
34
35
36
37
38
39
40
41
42
43
44
45
46
47
48
49
50
51
52
53

public class LocalService extends Service {
private final IBinder binder = new LocalBinder();
private ServiceCallback callback;

public interface ServiceCallback {
void onServiceStarted(boolean state);
}

public class LocalBinder extends Binder {
public LocalService getService() {
return LocalService.this;
}
}

@Override
public IBinder onBind(Intent intent) {
Logger.logError("LocalService", "onBind");
return binder;
}

@Override
public void onCreate() {
super.onCreate();
Logger.logError("LocalService", "Service Created");
}

@Override
public int onStartCommand(Intent intent, int flags, int startId) {
final String ACTION_USB_PERMISSION = TermuxConstants.TERMUX_API_PACKAGE_NAME + ".USB_PERMISSION";
Logger.logError("LocalService", "Service Started");
String action = intent.getAction();
Logger.logInfo("action -> " + action);
if (ACTION_USB_PERMISSION.equals(action)) {
synchronized (this) {
UsbDevice device = intent.getParcelableExtra(UsbManager.EXTRA_DEVICE);
if (intent.getBooleanExtra(UsbManager.EXTRA_PERMISSION_GRANTED, false)) {
if (device != null) {
callback.onServiceStarted(true);
}
} else {
callback.onServiceStarted(false);
}
}

}
return START_STICKY;
}

public void setCallback(ServiceCallback callback) {
this.callback = callback;
}
}
1
2
3
4
5
6
7
8
9
10
11
12
13
14
15
16
17
18
19
20
21
22
23
24
25
26
27
28
29
30
31
32
33
34
35
36
37
private static boolean requestPermission(final @NonNull UsbDevice device, final Context context) {
Looper.prepare();
Looper looper = Looper.myLooper();
final boolean[] result = new boolean[1];
Intent intent = new Intent(context, LocalService.class);
final String ACTION_USB_PERMISSION = TermuxConstants.TERMUX_API_PACKAGE_NAME + ".USB_PERMISSION";
final ServiceConnection connection = new ServiceConnection() {
@Override
public void onServiceConnected(ComponentName className, IBinder service) {
Logger.logInfo("onServiceConnected");
LocalService localService;
LocalService.LocalBinder binder = (LocalService.LocalBinder) service;
localService = binder.getService();
localService.setCallback(new LocalService.ServiceCallback() {
@Override
public void onServiceStarted(boolean state) {
result[0] = true;
if (looper != null) looper.quit();
Logger.logInfo(">onServiceStarted");
}
});
final UsbManager usbManager = (UsbManager) context.getSystemService(Context.USB_SERVICE);
intent.setAction(ACTION_USB_PERMISSION);
PendingIntent permissionIntent = PendingIntent.getService(context, 0, intent, 0);
usbManager.requestPermission(device, permissionIntent);
}

@Override
public void onServiceDisconnected(ComponentName arg0) {
}
};
Logger.logInfo("bindService");
context.getApplicationContext().bindService(intent, connection, Context.BIND_AUTO_CREATE);
Logger.logInfo("bindService done");
Looper.loop();
return result[0];
}

这个代码实现后,ADB KIT 和 Uncon 就能极快的获取到连接的 OTG 设备了

当然文中还有一个地方没有展开,就是那个 custom_adb,到底是如何设计的,也许会再有一篇文章来讲解

作者

梦魇兽

发布于

2024-09-02

更新于

2024-09-02

许可协议

评论